The Date picker is a very common control that we find on many websites, especially on booking services. There are also many ways to implement Date Picker – some allow the user to enter the date into the Textbox to choose the date, while others require the user to click on the calendar. This post shows how to work with Date picker when clicking on the calendar is mandatory using Selenium with Java.

The example we use today is the Date Picker on flighthub.com
There are a few things that we need to be aware of before working with this control:
+ We cannot search for any past day.
+ We can only search from current day.
+ We can search until the last day of this month of next year, but we cannot search further that time.
=> So let’s say we go to this website today – as of this blog, it is April 24, 2019 or 24/04/2019, the period we can search is from 24/04/2019 – 30/4/2020.
We use these variables to track for elements in this blog:
dpFromMonth is the month in the calendar on the left side
dpFromYear is the year in the calendar on the left side
expectedDay is the day input by the user
expectedMonth is the month input by the user
expectedYear is the year input by the user
First, when we click on the Departure Textbox, the Date picker control appears. Depends on your approach, there are different ways to interact with this control. For us, we focus on the arrows that we can move to next / previous month, the label that shows the month and year of the calendar, and the day to be clicked. So we grabs these elements as below:


By byCalendarArrow = By.cssSelector("a[data-handler='next']");
By byLeftTable = By.cssSelector("div[class='ui-datepicker-group ui-datepicker-group-first']");
By byCalendarBody = By.cssSelector("div[class='ui-datepicker-group ui-datepicker-group-first'] >  table[class='ui-datepicker-calendar'] > tbody");
From the structure above, we can see that the control is divided into 2 sections
“ui-datepicker-group ui-datepicker-group-first” contains all elements for the left section of the control, and
“ui-datepicker-group ui-datepicker-group-last” contains the right section. Since we are interest in the label that contains the month and the year, we only need to specify these div as the root, and we can then find their children element later.
Second, since we know that we can only search from today until this month next year, so we always start working from the left side of this control. If we works on the right side, we cannot search for any date in this month.

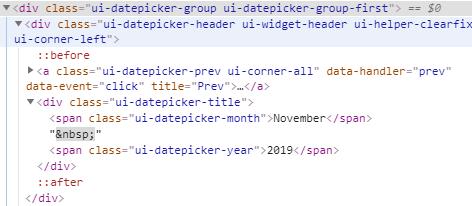
Starting at the root of the left table that we have above, we can find those two span elements using the code below:
WebElement dpTable = driver.findElement(byLeftTable);
WebElement dpTitle = dpTable.findElement(By.className("ui-datepicker-title"));
WebElement dpFromMonth = dpTitle.findElement(By.className("ui-datepicker-month"));
WebElement dpFromYear = dpTitle.findElement(By.className("ui-datepicker-year"));
Now we got the month and the year that shows in the Calendar in dpFromMonth and dpFromYear, we are going to compare it with the date that the user going to input.
For the sake of simplicity, we assume the user uses an input date as of “24/06/2019”. We are going to parse this date into separated variables in order to compare with the date in the Calendar. Let’s say the “24/06/2019” is passed to the method by a parameter as String, then we can use the SimpleDateFormat from Java library to parse this string, and get the day, month, year using the Calendar class.
String expectedDay = GetDayFromDate(date);
String expectedMonth = GetMonthFromDate(date);
String expectedYear = GetYearFromDate(date);
private Calendar ParseDate(String date) throws ParseException
	{
		SimpleDateFormat dateFormat = new SimpleDateFormat("dd/MM/yyyy");
		Date temporary = dateFormat.parse(date);
		Calendar c = Calendar.getInstance();
		c.setTime(temporary);
		return c;
	}

	private String GetDayFromDate(String date) throws ParseException
	{
		Calendar c = ParseDate(date);
		return String.valueOf(c.get(Calendar.DATE));
	}

	private String GetMonthFromDate(String date) throws ParseException
	{
		Calendar c = ParseDate(date);
		return c.getDisplayName(Calendar.MONTH, Calendar.LONG, Locale.getDefault());
	}

	private String GetYearFromDate(String date) throws ParseException
	{
		Calendar c = ParseDate(date);
		return String.valueOf(c.get(Calendar.YEAR));
	}
From the code above, we get expectedDay = 24, expectedMonth = June, expectedYear = 2019. Please note that the getDisPlayName will return the name of the month, instead of an integer value.
Now we are going to compare this expectedMonth and expectedYear with dpFromMonth and dpFromYear, if they are not match, we will keep clicking the calendar arrow until we have all of them equal.
// loop to find match month and year
// == cannot be used to compare string, == mean having the same memory storing location
while(!dpFromMonth.getText().equals(String.valueOf(expectedMonth)) || !dpFromYear.getText().equals(String.valueOf(expectedYear)))
{
	//loop clicking arrow
	calendarArrow = driver.findElement(byCalendarArrow);
	calendarArrow.click();

	//find the whole calendar month and year again, the date picker element is stale / reset
	dpTable = driver.findElement(byLeftTable);
	dpTitle = dpTable.findElement(By.className("ui-datepicker-title"));
	dpFromYear = dpTitle.findElement(By.className("ui-datepicker-year"));
	dpFromMonth = dpTitle.findElement(By.className("ui-datepicker-month"));
}
In this loop, first we click on the arrow to go to next month, and we have to get the dpFromMonth, dpFromYear elements again. Why? Since we click on the arrow, even though the calendar stays the same to human eyes, the actual elements on the web that we got before this step become stale or no longer attach to the DOM. Here is the result if we don’t find those elements again.

After the loop, now the calendar is at a state where expectedMonth is the same with dpFromMonth, and expectedYear is the same with dpFromYear. We are going to click on the day on the calendar based on expectedDay variable.

How does this calendar look like?

We are going to use the By element byCalendarBody that we defined near the beginning of this post. From this root, we try to find all <tr> tags, we loop through every single <td> inside each tr, and compare the text with expectedDay. If they match, we click on that element.
WebElement calendarBody = driver.findElement(byCalendarBody);
List days;
WebElement dayTobeClicked = null;

List allRows = calendarBody.findElements(By.tagName("tr"));

Boolean found = false;
for (WebElement temp : allRows) {
	days = temp.findElements(By.tagName("a")); // we have to find the text inside each <a> tag
	for (WebElement temp2 : days) {          // day within rows
		 if(temp2.getText().equals(expectedDay))
		 {
			 dayTobeClicked = temp2;
			 found = true;
			 break;
		 }
	}
	if(found == true)
		break;
}

dayTobeClicked.click();
It works for most time periods, except one case when the user inputs any day of this month of next year. The reason why it does not work is once we reach to this month of next year, the day is on the right side of the control.

To get it works, we put a hack into our loop in the comparison of dpFromMonth and dpFromYear by checking for the arrow. If we do a test manually, when we are at that state, the arrow disappears and the user cannot search further than that time, so we put a check on the arrow if the element is not exist, we exit the loop.
if(driver.findElements(byCalendarArrow).size() <1)
	break;
Then we try to find the day on the right side of the calendar, not the left side.
if(!dpFromMonth.getText().equals(expectedMonth))
{
	byCalendarBody = By.cssSelector("div[class='ui-datepicker-group ui-datepicker-group-last'] >  table[class='ui-datepicker-calendar'] > tbody");
}
Notice that we use the div with class = “ui-datepicker-group ui-datepicker-group-last“
The source can be found in my github.
https://github.com/quan612/TestPlaneTicket/blob/master/src/test/java/seleniumTests/CommonRepository.java


